Completion of foundations
Did not wish to bore you with too much detail about laying breezeblocks, sufficient to say, job is done and we can move onto the next phase of the build.
detail of steel reinforcing for garage, 10mm rolled steel, put on every row on the garage door side, otherwise every second row.


garage foundations, breezeblocks completed


That is the majority of the breezeblocks done, next stage is to do the various pillars that we are putting, on the gable end will be a terrace, we are putting pillar foundations for the terrace to rest upon, on the other gable will be a small roof over the outside door, this requires a couple of pillars to support it.
Pillar supports for small roof structure

Pillar supports for terrace

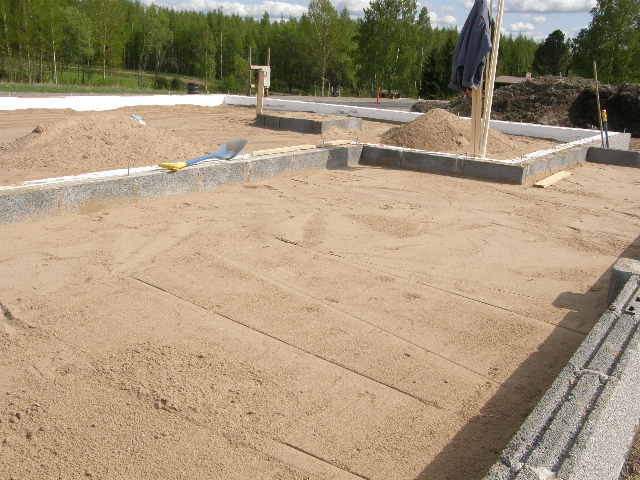
house foundations and terrace support pillars

detail of pillar, this is filled later with concrete to give it the strength it requires to support weights

That is all the bricklaying done in the foundations, next phase is to finish things off, insulation on the inside and insulation on the ground outside,
A 20cm strip of styrofoam fitted onto the upper blocks

then a sheet of styrofoam on top, 1200 x 1000 x 50 mm

finally another full size sheet of styrofoam, giving 10cm's of insulation on the inside, upper part is 15cm's

Tarja busy cutting the styrofoam and fitting it


Insulation is everything these days, with the need to cut emissions and the carbon footprint the demands on insulation have soared recently, ofcourse a lot of it is in our own interest, as with the rising cost of energy, every part of the insulation keeps those ever so important heating costs down.
meanwhile, while Tarja was doing the insulation on the inside, we on the outside were finishing off the foundations, first on the agenda was to fit a dimpled plastic waterproofing sheet around the foundations, (Pato Levy) this is to stop moisture from the ground penetrating to the breezeblocks, the dimples ensure that there is air trapped between it and the foundations, any water that manages to penetrate will be able to evaporate.
Pato Levy, with the moulded list on top

once that was done, next up is to put a fine render on the blocks which are still visible, this is a water-resistant render, strengthened with the addition of fibre to give it tensile strength, it is done to a depth of 3 to 4 mm
fine rendering coat, gives a smooth finish for later on.

detail, showing depth

after allowing the render to dry thoroughly, (24hrs), it is now time to finish it off, glue is applied to the render and stone chips are pressed into it, this leaves us with a nice maintenance free surface
one side render, other side stone chipped, do this all the way around and never have to do any work on the foundations ever again.

next job on the list, we have to fit the rainwater drains, for obvious reasons, these are large tubs under each downpipe, it has a collector at the bottom, this is to enable us to clean them occasionally, all sorts of things can collect there, usually seeds from the birch trees as they are rather abundant in this place. rainwater is then allowed to flow out via a 10cm pipe to the main drainage system, (actually it is led away to a small stream about 100m away from the house) rainwater is not exhausted into the main sewers.
rainwater drain and pipe. the pipe is 1 metre deep to avoid freezing.


next it was the turn of the outer insulation for the foundations, this consists of 10cm syrofoam all the way around the house, this is to protect the foundations from the penetrating frost we have each winter, avoiding damage to the foundations, (don't you just love winter?)


terrace pillars awaiting insulation

All the insulation complete, drains fitted, stone chipping done, guess it was time to bury it for all time, this entailed getting the groundwork contractor to pay us a visit for a couple of days, at the same time he would arrange delivery of various grades of hardcore and filling materials, I hate to think how much of this stuff we will need, but the house itself takes over 100 cubic meters of hardcore and sand filling.
So it begins, a rather course grade to start the ball rolling 0 to 100 mm, quite chunky stuff, big is good as it has a better load bearing potential, in the picture Ari is using the packer to beat it down into a solid mass.


After the initial filing to about 70cm, a finer grade is used, in this case sand as we still have to fit all the drains and pipes in the house, this final 30cmgives us a nice base with which to work with, using sand allows us to bed the pipes and not have to worry about any damage that stones could cause to the pipes, the black pipe in the picture is to collect Radon gas, this is classed as dangerous in Finland (seemingly a cause of lung cancer) and it must be extracted fro the ground and led via pipes to the outside, in this case, gas collects in the pipe and is vented through the roof. the pipe itself is full of minuscule holes that the gas can seep into.


All filled in


That is as far as we can go at the moment, next stage is to prepare the glass terrace area for a floor and the garage also, as I can use these places as working areas and storage for materials later
Glass terrace area, as this is on the outside and will not be heated at all, the requirement is only 10cm's of styrofoam, on top of this is a steel mat to give additional strength to the floor.

Now lets switch our attention to the garage
Garage, insulated and awaiting filling

that is that taken care off

Styrofoam and iron mat fitted


final tidying up of the plot

Anyone seen my pillars?

Final job for this week is to make the frame for the terrace, a bit cart before the horse, there is a method in my madness, it was not just to give the neighbours a laugh. if I do the framework for it now, it gives me a very handy level storage area for the timber I will be sacrificing to the Gods of home building in the coming weeks
50 x 200 bottom support, upper is 50 x 125

Sitting nicely on the pillars, well supported, do not envisage any movement or buckling of the terrace.


Would you belive it, roof trusses arrived on time, now all I need is a frame to stick them to, at least I have something to work on next week.

That's it for the last two weeks then, 430 hours went into the foundations, we can also count that it is 20% of the build done, the next 20% takes a bit more time and a bit more exacting work.
Stay tuned
detail of steel reinforcing for garage, 10mm rolled steel, put on every row on the garage door side, otherwise every second row.


garage foundations, breezeblocks completed


That is the majority of the breezeblocks done, next stage is to do the various pillars that we are putting, on the gable end will be a terrace, we are putting pillar foundations for the terrace to rest upon, on the other gable will be a small roof over the outside door, this requires a couple of pillars to support it.
Pillar supports for small roof structure

Pillar supports for terrace

house foundations and terrace support pillars

detail of pillar, this is filled later with concrete to give it the strength it requires to support weights

That is all the bricklaying done in the foundations, next phase is to finish things off, insulation on the inside and insulation on the ground outside,
A 20cm strip of styrofoam fitted onto the upper blocks

then a sheet of styrofoam on top, 1200 x 1000 x 50 mm

finally another full size sheet of styrofoam, giving 10cm's of insulation on the inside, upper part is 15cm's

Tarja busy cutting the styrofoam and fitting it


Insulation is everything these days, with the need to cut emissions and the carbon footprint the demands on insulation have soared recently, ofcourse a lot of it is in our own interest, as with the rising cost of energy, every part of the insulation keeps those ever so important heating costs down.
meanwhile, while Tarja was doing the insulation on the inside, we on the outside were finishing off the foundations, first on the agenda was to fit a dimpled plastic waterproofing sheet around the foundations, (Pato Levy) this is to stop moisture from the ground penetrating to the breezeblocks, the dimples ensure that there is air trapped between it and the foundations, any water that manages to penetrate will be able to evaporate.
Pato Levy, with the moulded list on top

once that was done, next up is to put a fine render on the blocks which are still visible, this is a water-resistant render, strengthened with the addition of fibre to give it tensile strength, it is done to a depth of 3 to 4 mm
fine rendering coat, gives a smooth finish for later on.

detail, showing depth

after allowing the render to dry thoroughly, (24hrs), it is now time to finish it off, glue is applied to the render and stone chips are pressed into it, this leaves us with a nice maintenance free surface
one side render, other side stone chipped, do this all the way around and never have to do any work on the foundations ever again.

next job on the list, we have to fit the rainwater drains, for obvious reasons, these are large tubs under each downpipe, it has a collector at the bottom, this is to enable us to clean them occasionally, all sorts of things can collect there, usually seeds from the birch trees as they are rather abundant in this place. rainwater is then allowed to flow out via a 10cm pipe to the main drainage system, (actually it is led away to a small stream about 100m away from the house) rainwater is not exhausted into the main sewers.
rainwater drain and pipe. the pipe is 1 metre deep to avoid freezing.


next it was the turn of the outer insulation for the foundations, this consists of 10cm syrofoam all the way around the house, this is to protect the foundations from the penetrating frost we have each winter, avoiding damage to the foundations, (don't you just love winter?)


terrace pillars awaiting insulation

All the insulation complete, drains fitted, stone chipping done, guess it was time to bury it for all time, this entailed getting the groundwork contractor to pay us a visit for a couple of days, at the same time he would arrange delivery of various grades of hardcore and filling materials, I hate to think how much of this stuff we will need, but the house itself takes over 100 cubic meters of hardcore and sand filling.
So it begins, a rather course grade to start the ball rolling 0 to 100 mm, quite chunky stuff, big is good as it has a better load bearing potential, in the picture Ari is using the packer to beat it down into a solid mass.


After the initial filing to about 70cm, a finer grade is used, in this case sand as we still have to fit all the drains and pipes in the house, this final 30cmgives us a nice base with which to work with, using sand allows us to bed the pipes and not have to worry about any damage that stones could cause to the pipes, the black pipe in the picture is to collect Radon gas, this is classed as dangerous in Finland (seemingly a cause of lung cancer) and it must be extracted fro the ground and led via pipes to the outside, in this case, gas collects in the pipe and is vented through the roof. the pipe itself is full of minuscule holes that the gas can seep into.


All filled in

That is as far as we can go at the moment, next stage is to prepare the glass terrace area for a floor and the garage also, as I can use these places as working areas and storage for materials later
Glass terrace area, as this is on the outside and will not be heated at all, the requirement is only 10cm's of styrofoam, on top of this is a steel mat to give additional strength to the floor.

Now lets switch our attention to the garage
Garage, insulated and awaiting filling

that is that taken care off

Styrofoam and iron mat fitted


final tidying up of the plot

Anyone seen my pillars?

Final job for this week is to make the frame for the terrace, a bit cart before the horse, there is a method in my madness, it was not just to give the neighbours a laugh. if I do the framework for it now, it gives me a very handy level storage area for the timber I will be sacrificing to the Gods of home building in the coming weeks
50 x 200 bottom support, upper is 50 x 125

Sitting nicely on the pillars, well supported, do not envisage any movement or buckling of the terrace.


Would you belive it, roof trusses arrived on time, now all I need is a frame to stick them to, at least I have something to work on next week.

That's it for the last two weeks then, 430 hours went into the foundations, we can also count that it is 20% of the build done, the next 20% takes a bit more time and a bit more exacting work.
Stay tuned
posted by Jim Henderson at
00:54
![]()


0 Comments:
Post a Comment
Subscribe to Post Comments [Atom]
<< Home